How To Set Up MetaMask for XRPL EVM (Desktop Guide)

Desktop Wallet: MetaMask for XRPL EVM
To use the XRPL EVM sidechain, you'll need a wallet that speaks the language of Ethereum. MetaMask is a trusted choice - used across thousands of EVM-compatible apps and chains, including Ethereum, Arbitrum, Base, and now, XRPL EVM.
Unlike XRPL wallets like Xaman or Crossmark, MetaMask is built for EVM chains. You’ll need it to explore apps and tools on XRPL EVM, and it also works seamlessly with networks like Ethereum, Arbitrum, Polygon, and Base.
MetaMask is a self-custodial hot wallet - which means you hold your own keys, stored locally and encrypted on your device. It stays connected to the internet for fast, real-time use, but with that power comes responsibility: you’re in full control of your assets, and also fully responsible for keeping them safe.
MetaMask works on both desktop and mobile. This guide walks through the desktop setup - if you’re using a phone, check out our mobile guide →
Looking for an XRPL wallet instead? Check out How to Set Up Your XRP Ledger Wallet (Mobile or Desktop) →
Tips to Stay Safe
- Write down your recovery phrase and store it offline - never in your phone, browser, or cloud.
- Never share your phrase. No legit project or support team will ever ask for it.
- Losing your phrase = losing your wallet. There’s no reset option, so store it safely.
- Avoid unknown links and transactions. Always double check what you're signing.
- Never approve unexpected pop-ups in your browser extension, and only use trusted apps.
How to Set Up Your MetaMask Wallet
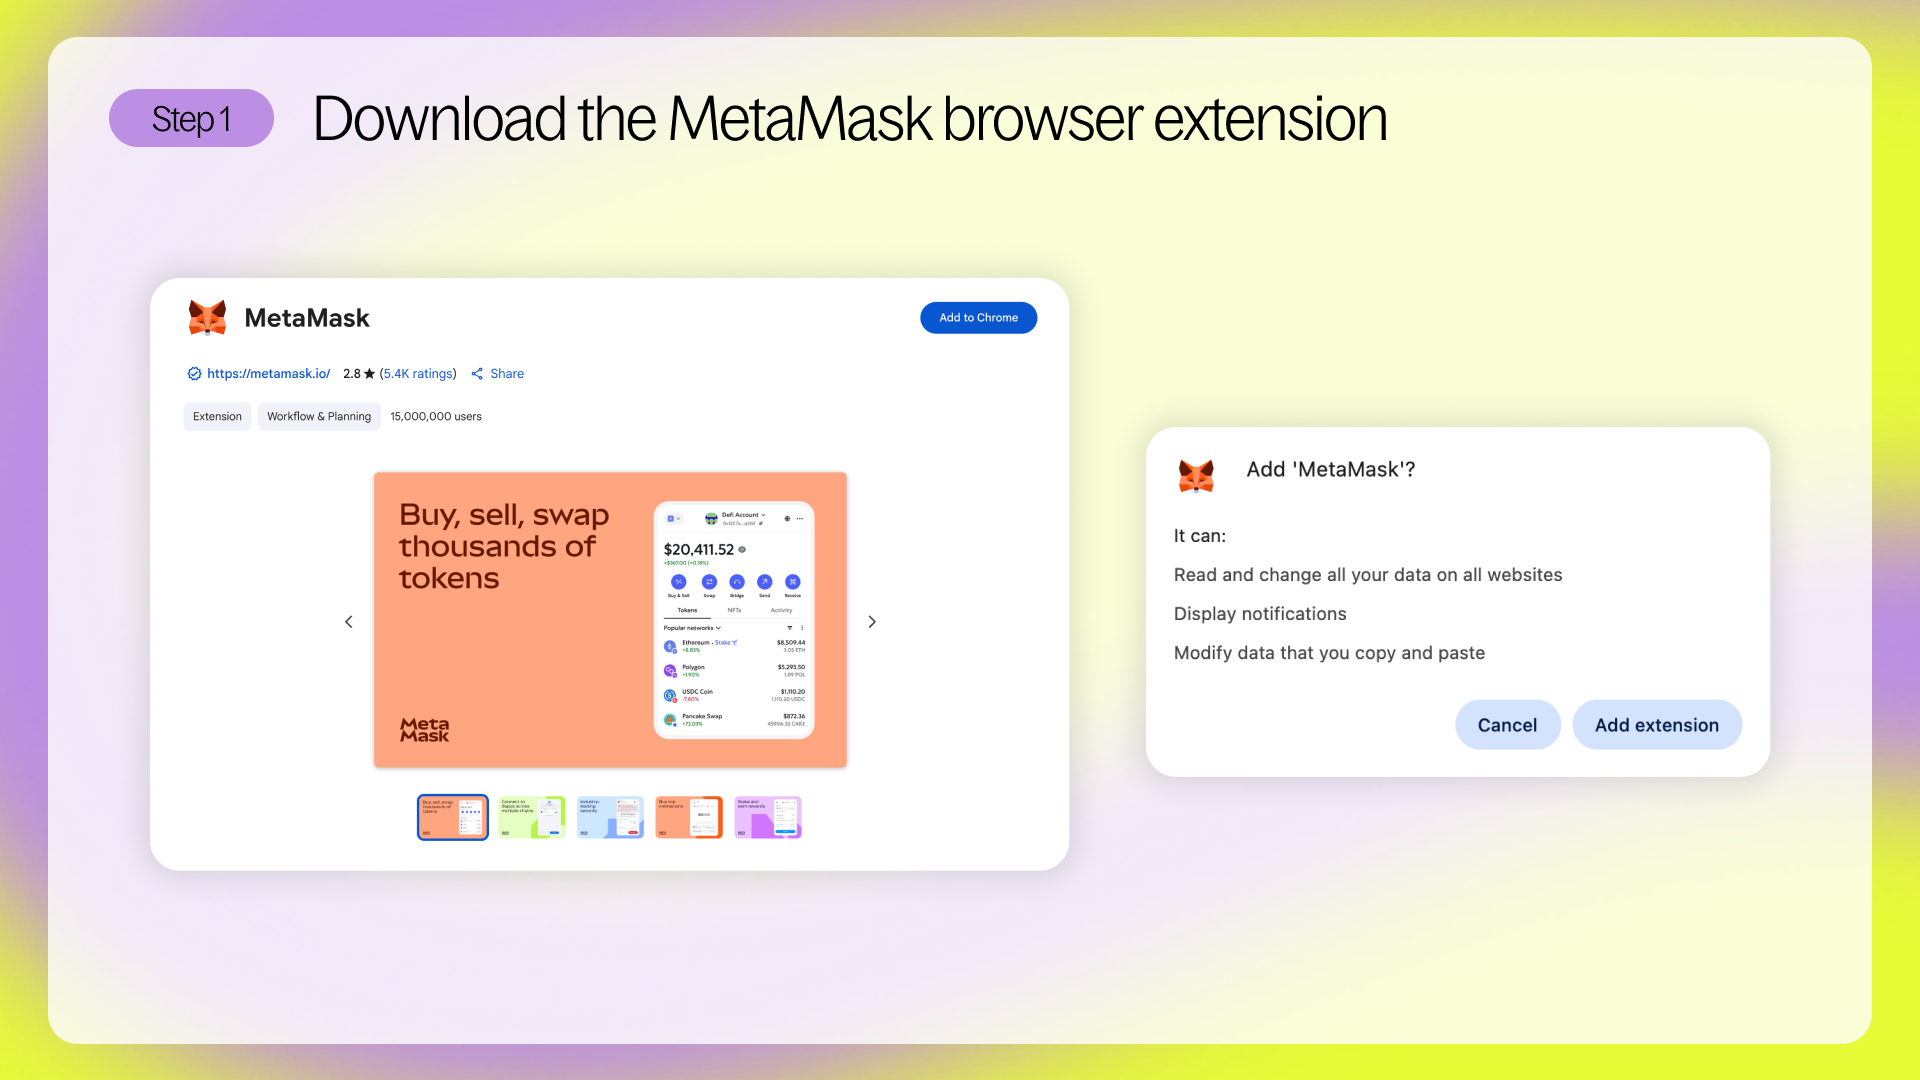
Step 1: Download MetaMask
Go to metamask.io/download and add the extension to your browser (Chrome, Brave, Firefox, or Edge supported).
Step 2: Follow the setup steps
Once MetaMask is downloaded, it should open automatically. If not, find the fox icon in your browser extensions and click it to begin.
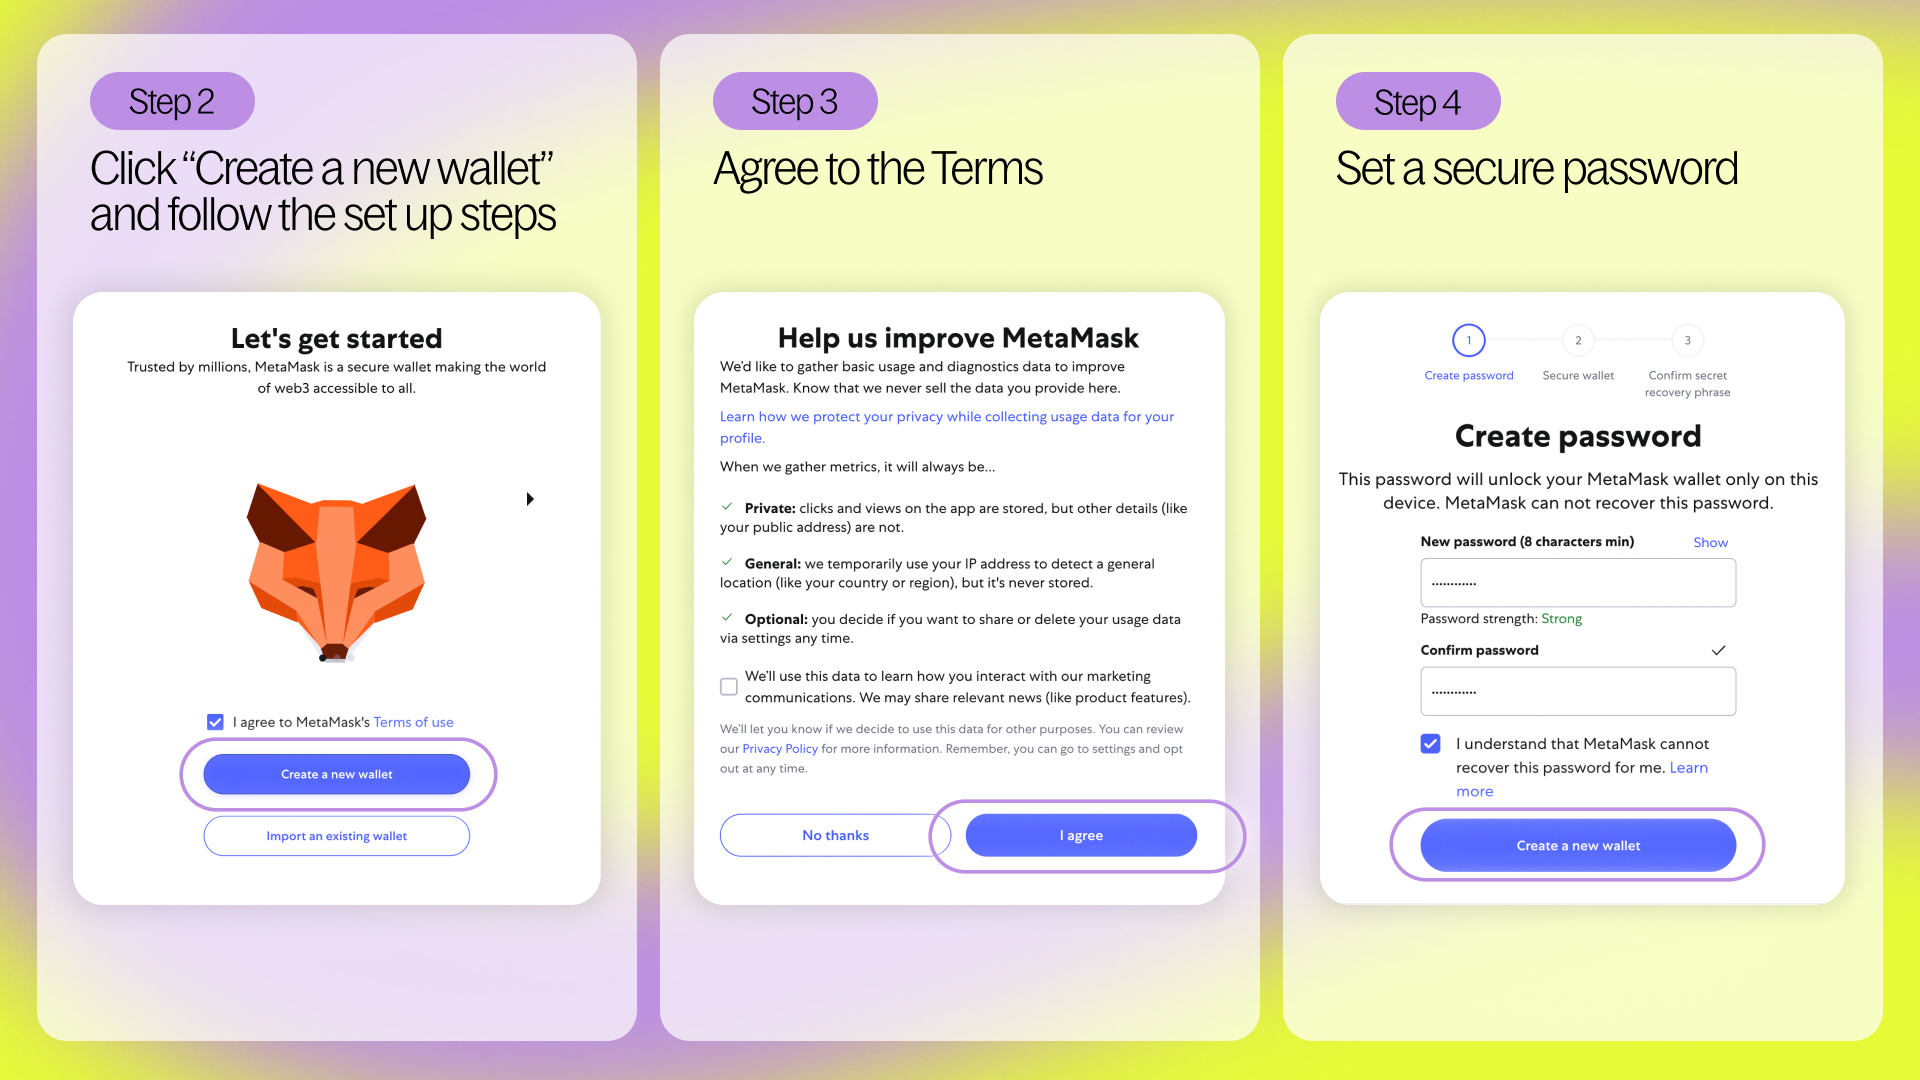
Once the setup flow begins, click Create a Wallet to begin the process.
Step 3: Agree to the Terms
After selecting "Create a Wallet", you’ll be asked to agree to MetaMask’s terms of use. Read and accept to continue.
Step 4: Set a secure password
Choose a password you’ll use to unlock the wallet and approve transactions. This protects your wallet on your device.
Note: This is not your recovery phrase. If you forget your password, you can still recover the wallet using your recovery phrase.
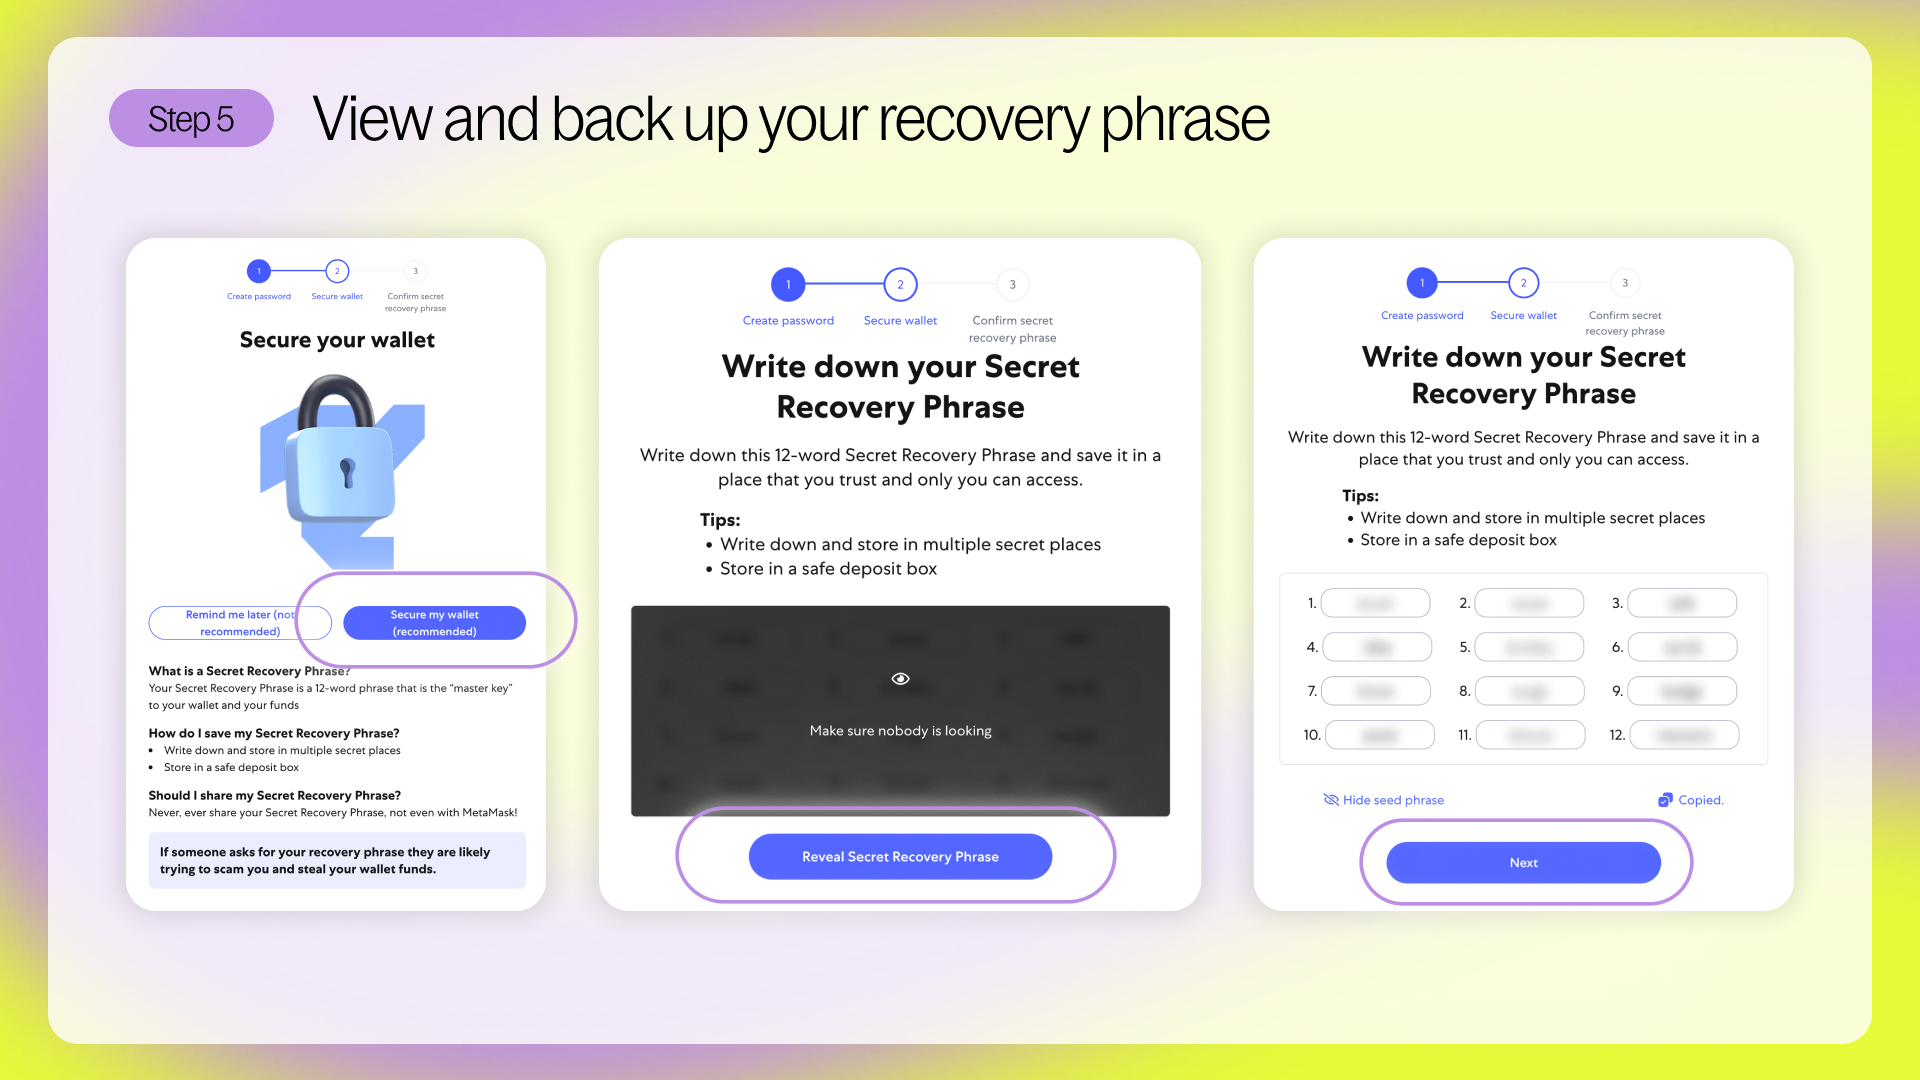
Step 5: View and back up your recovery phrase
You’ll now see your secret recovery phrase - also called a seed phrase. It’s a sequence of words that gives full access to your wallet and funds.
This is your master key: if it’s lost, there’s no recovery. If it’s safe, so are your assets.
Write it down on paper and store it somewhere offline and secure. Never save it to your phone, email, cloud, or password manager. And never share it with anyone - even if they claim to be from MetaMask support.
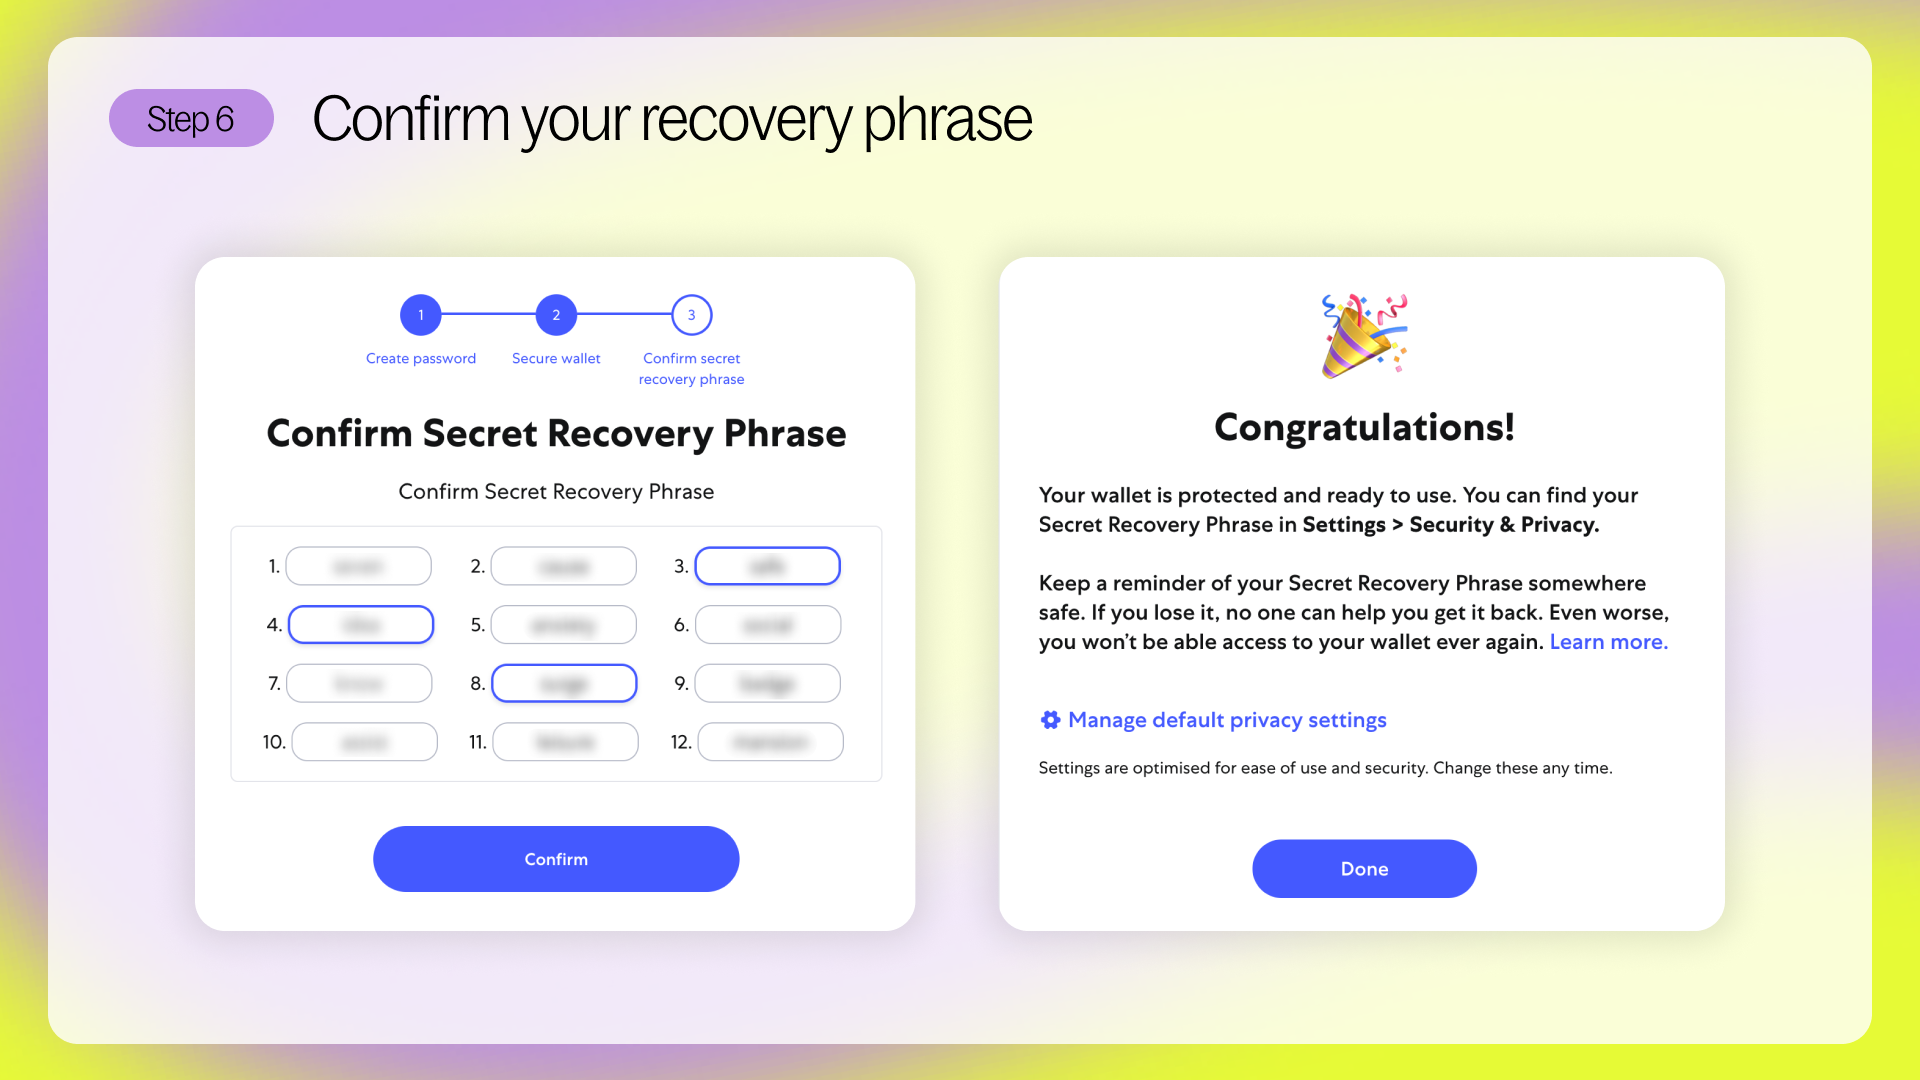
Step 6: Confirm your recovery phrase
You’ll be asked to re-enter your phrase to confirm that you’ve backed it up correctly. This is a critical step - don’t skip it or rush through it.
Once confirmed, your wallet is ready.
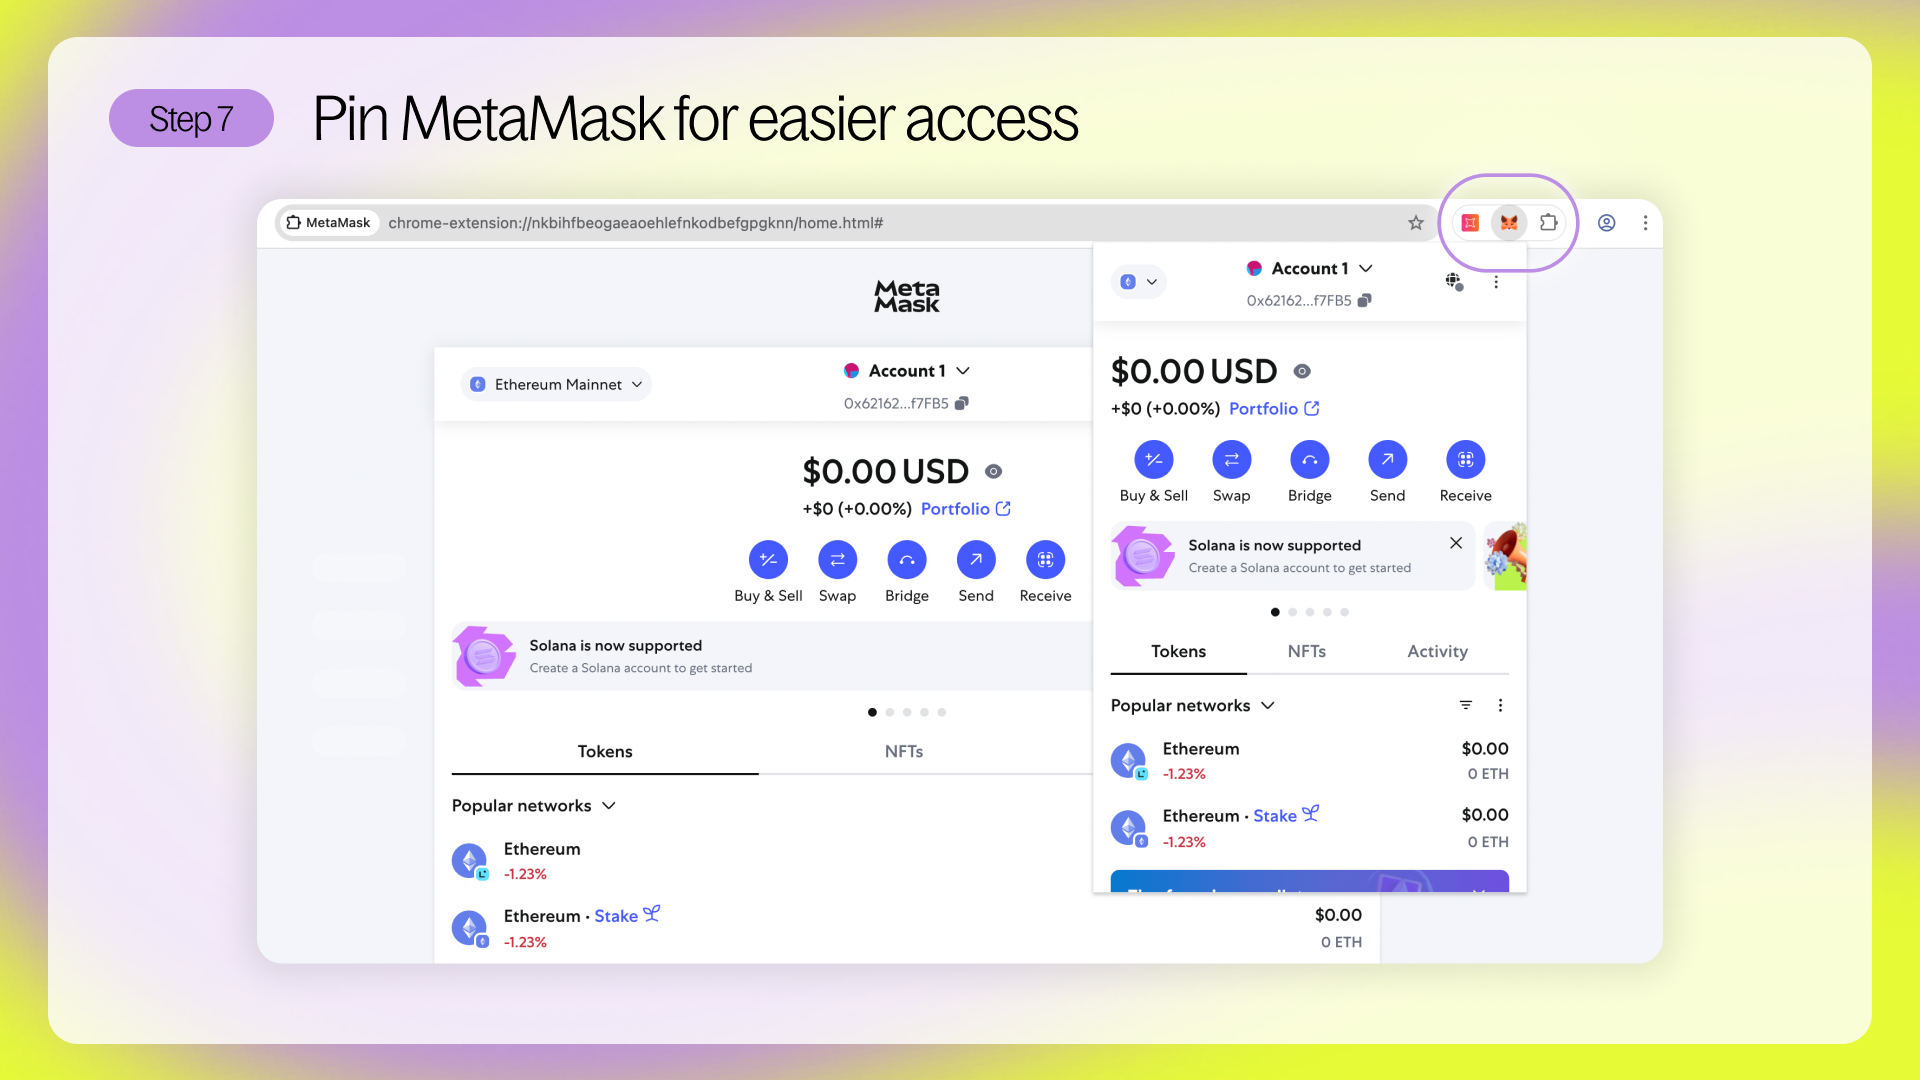
Step 7: Pin MetaMask for easier access
In your browser’s extensions area (usually a puzzle icon), click the MetaMask pin icon so you can always see the fox logo in your toolbar.
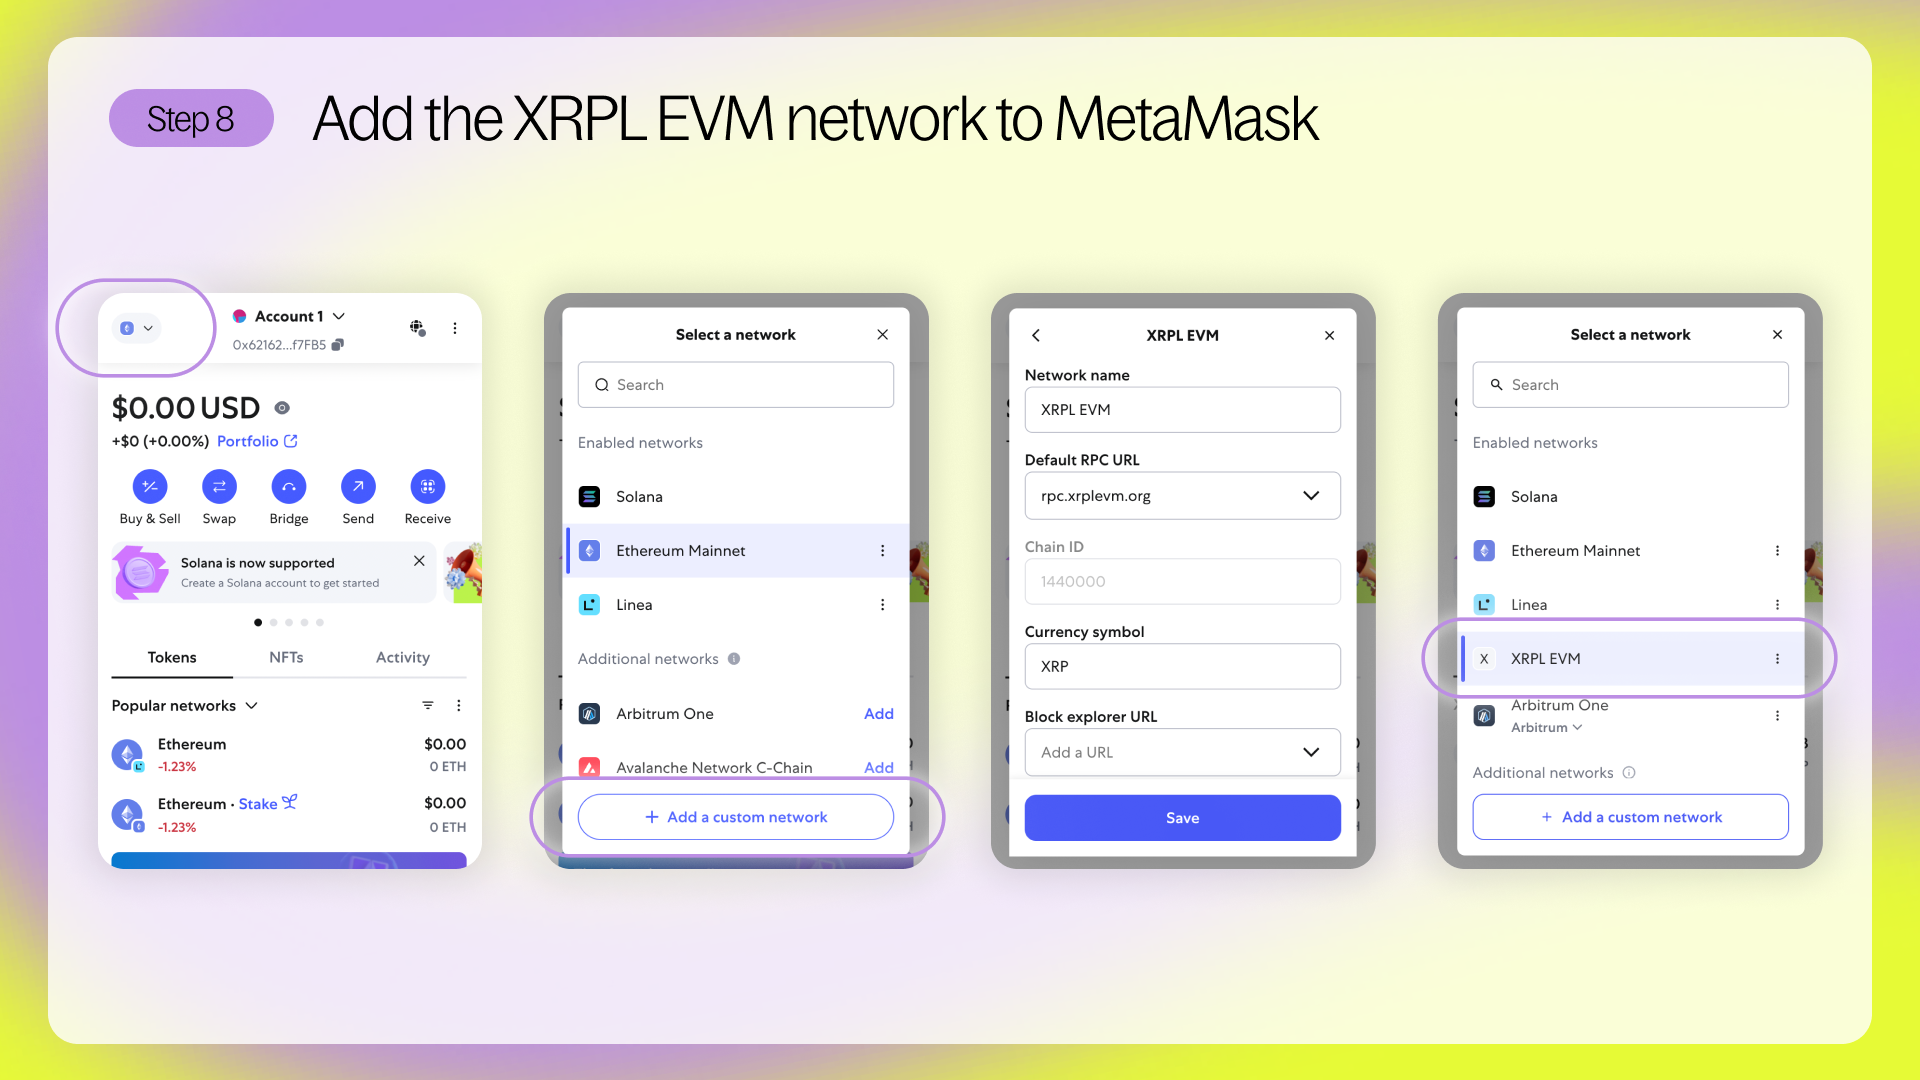
Step 8: Add the XRPL EVM network to MetaMask
MetaMask is built to support any EVM chain - but XRPL EVM won’t show up by default. To connect to it, you’ll need to add it manually using the network settings.
This only takes a minute, and once added, MetaMask will remember it. You’ll then be able to see your balance, send and receive tokens, and interact with dApps on the XRPL EVM sidechain - just like any other EVM chain.
To add the XRPL EVM:
- Click the network icon dropdown at the top right corner of the MetaMask window. On a fresh wallet, this will usually default to Ethereum Mainnet.
- Select Add custom network
- Enter the following details:
- Network Name: XRPL EVM
- Default RPC URL: https://rpc.xrplevm.org
- Chain ID: 1440000
- Currency symbol: XRP
Click Save. You’ll now see XRPL EVM listed in your network menu, and your wallet is ready to receive assets bridged into this chain.
View Your EVM wallet address
In the default wallet dashboard, you’ll see your public EVM address just under your account name - it’s a long string starting with 0x.
This is your wallet’s public address, like a bank account number. It’s safe to share so others can send you tokens, but it doesn’t give access to your wallet.
Your wallet lives on all EVM-compatible chains. XRPL EVM, Ethereum, Arbitrum - it’s all the same address, and all secured by the same recovery phrase.
Sending assets to your XRPL EVM wallet
To start using XRPL EVM, you’ll need to fund your MetaMask wallet.
The easiest way to get XRP on the XRPL EVM is to use Squid. If you already have XRP in an XRPL wallet like Crossmark or Xaman, follow our bridging guide to move it into XRPL EVM. Or, follow our EVM bridging guide if you have assets on other EVM chains.
Need to set up your XRPL wallet first? Start here: How to Set Up Your XRP Ledger Wallet (Mobile or Desktop) →
One wallet, many chains
If you’ve sent assets to your XRPL EVM wallet but don’t see them right away in MetaMask, it might be because you're viewing a different network like Ethereum or Arbitrum.
MetaMask gives you one wallet address across all EVM-compatible chains (Ethereum, Arbitrum, XRPL EVM, etc.). But what you see depends on the network you're viewing.
MetaMask shows your balances in two ways:
- Popular networks – an aggregated view of major networks and any where you hold a balance
- Current network – a focused view showing only the assets on the network you're currently connected to
To switch between them, go to the top of the Tokens tab in MetaMask and use the dropdown at the top. If you don’t see your tokens, make sure your network is switched to XRPL EVM.
You’re ready to explore!
Your MetaMask wallet is now live, secure, and connected to XRPL EVM.
You’re ready to start using XRP across smart contracts, NFTs, and onchain apps - all from your browser.
Unlike with XRPL wallets, there’s no activation required - MetaMask works straight out of the box. Once set up, you can bridge XRP into XRPL EVM using Squid and start exploring DeFi, dApps, and more.
See you onchain. 🦊🦑