How to Bridge XRP With Squid: Your Guide to XRP Ledger and the XRPL EVM

Bridging guide: XRPL ↔ XRPL EVM
Bridging XRP from the XRP Ledger (XRPL) to the XRPL EVM sidechain - and back again - is a great way to start using your XRP onchain.
This guide walks you through that full roundtrip: how to connect your wallets, move your XRP across chains, and understand what’s happening behind the scenes.
New to bridging? Start with What Is Bridging? (And Why It Matters for XRPL + XRP Holders) for a quick explainer before diving in.
What You’ll Need
Before we get started, make sure you have:
- An XRPL wallet (like Xaman or Crossmark) 👉 How to Set Up Your XRP Ledger Wallet (Mobile or Desktop)
- Some XRP in your XRPL wallet 👉 Every Way to Fund and Activate Your XRP Ledger Wallet
- An EVM-compatible wallet (like MetaMask) 👉 How to Set Up an XRPL EVM Wallet (Mobile or Desktop)
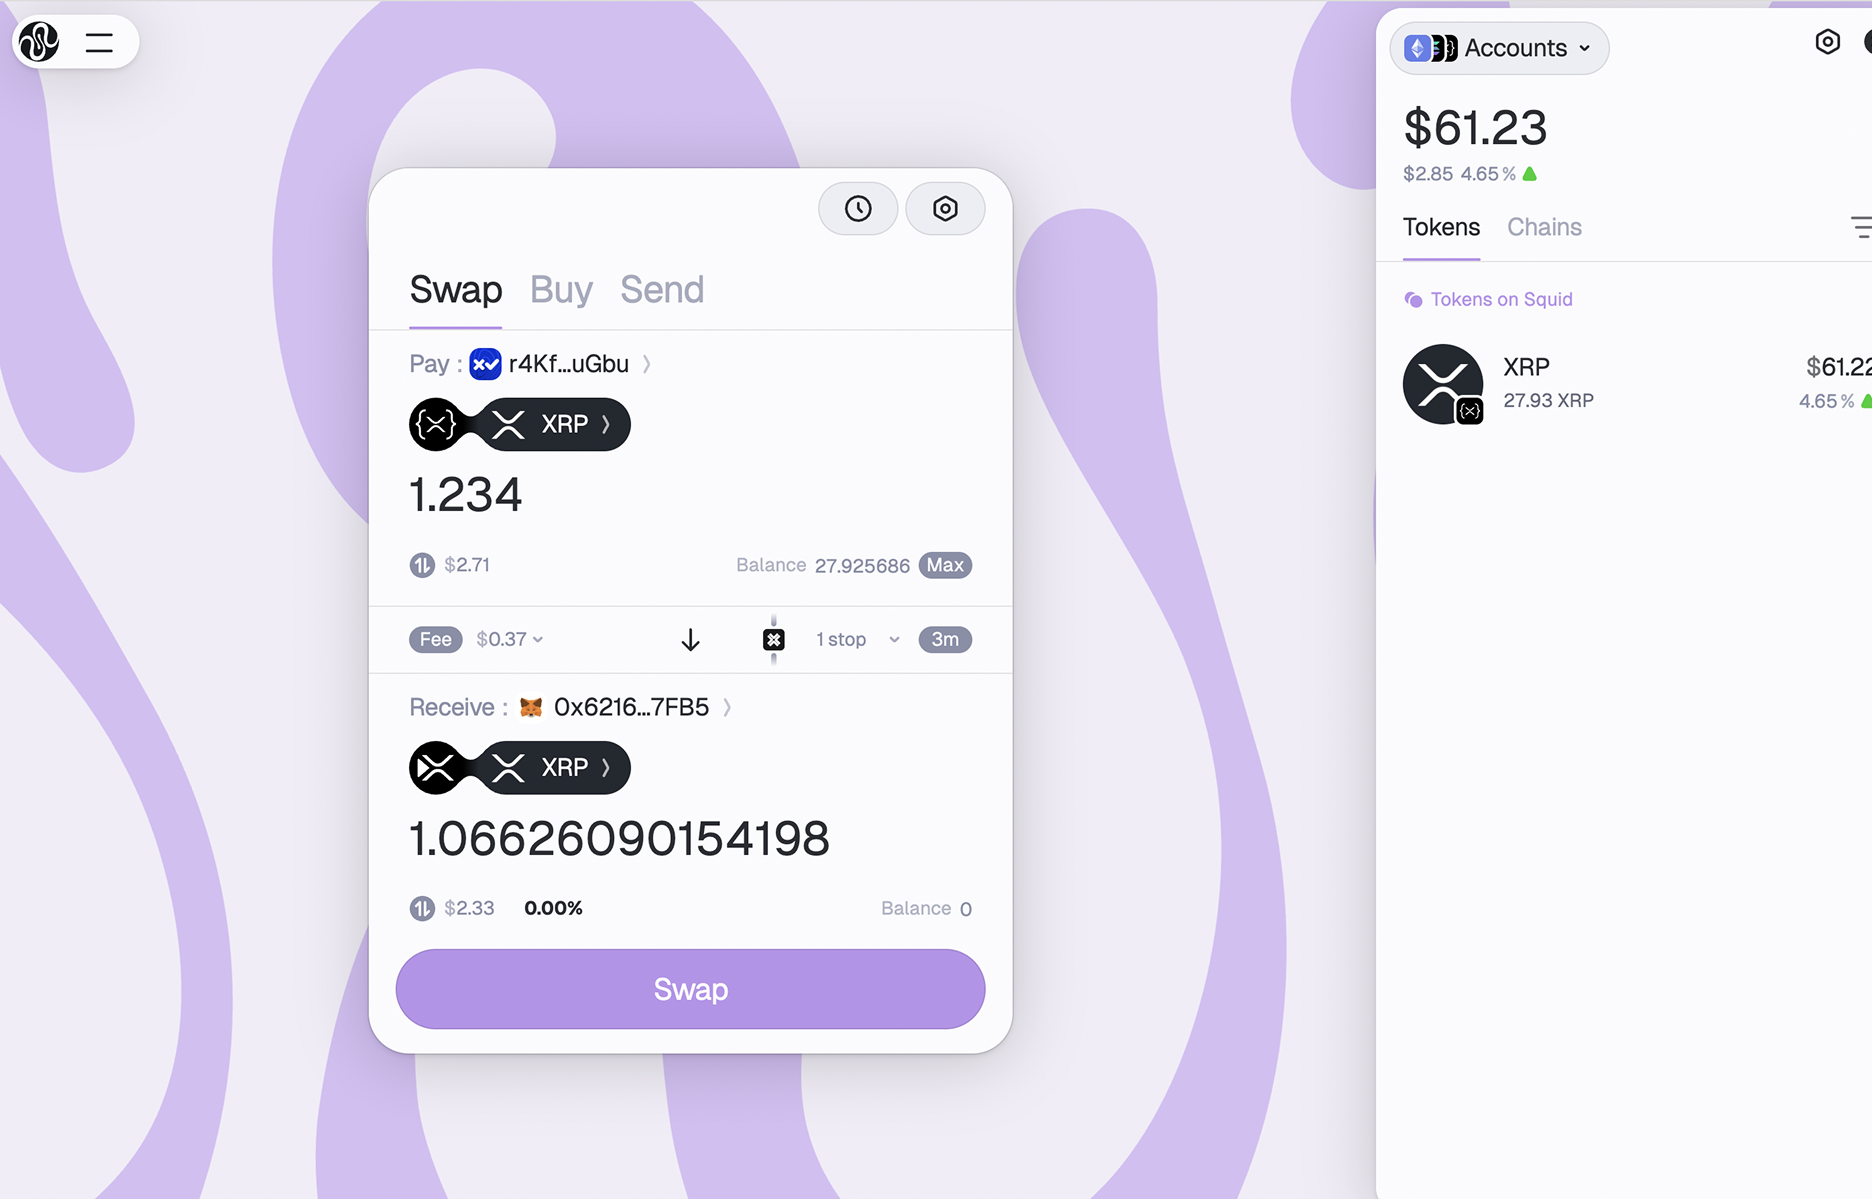
Why use Squid?
Squid’s app is the easiest way to bridge XRP across chains - trusted by thousands of users and powering billions in cross-chain volume.
You can connect your wallet, select any supported token, and Squid handles the rest. Behind the scenes, it finds the most efficient route across more than 80 supported chains using secure, decentralized protocols like Axelar. It works fast, securely, and without giving up control of your assets.
Once your wallet is connected, you’ll also see the Squid Wallet View, where you can view your balances across chains and see which tokens live where - all in one place, without needing to switch networks or tools.
Squid gives you full visibility and control at every step, making your cross-chain experience as smooth and beginner-friendly as possible.
How to bridge from XRPL to XRPL EVM
Let’s start by moving your XRP from the XRP Ledger (XRPL) to the XRPL EVM sidechain using Squid.
Squid supports direct bridges and swaps between XRPL and XRPL EVM, making it easy to bridge assets using the XRP you already hold in your wallet. In this example, we’ll walk through how to bridge XRP from XRPL to XRPL EVM step-by-step.
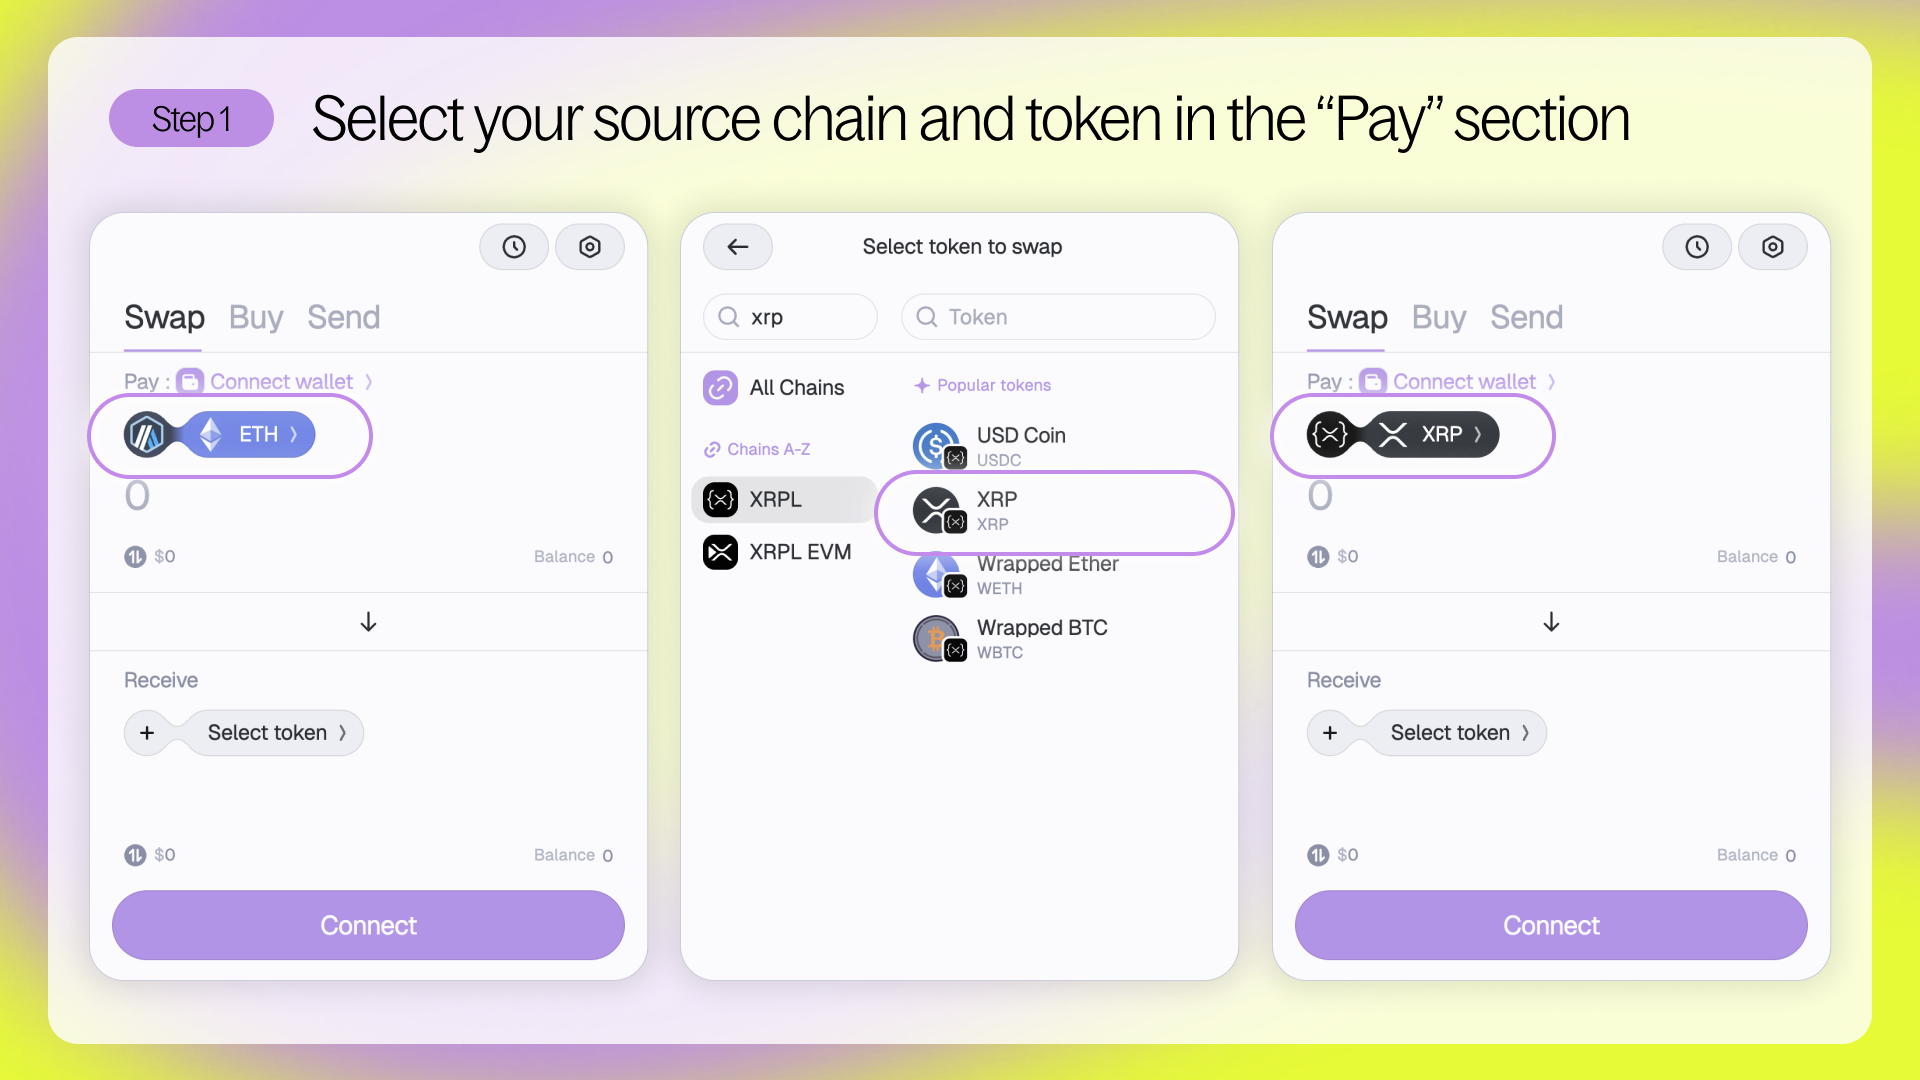
Step 1 - Select your source chain and token
Head to app.squidrouter.com Under the Pay section, click the dropdown to choose your source chain and token. Select XRPL as the chain and XRP as the token you want to send.
Note: You’ll only be able to select tokens you already hold in your connected wallet.
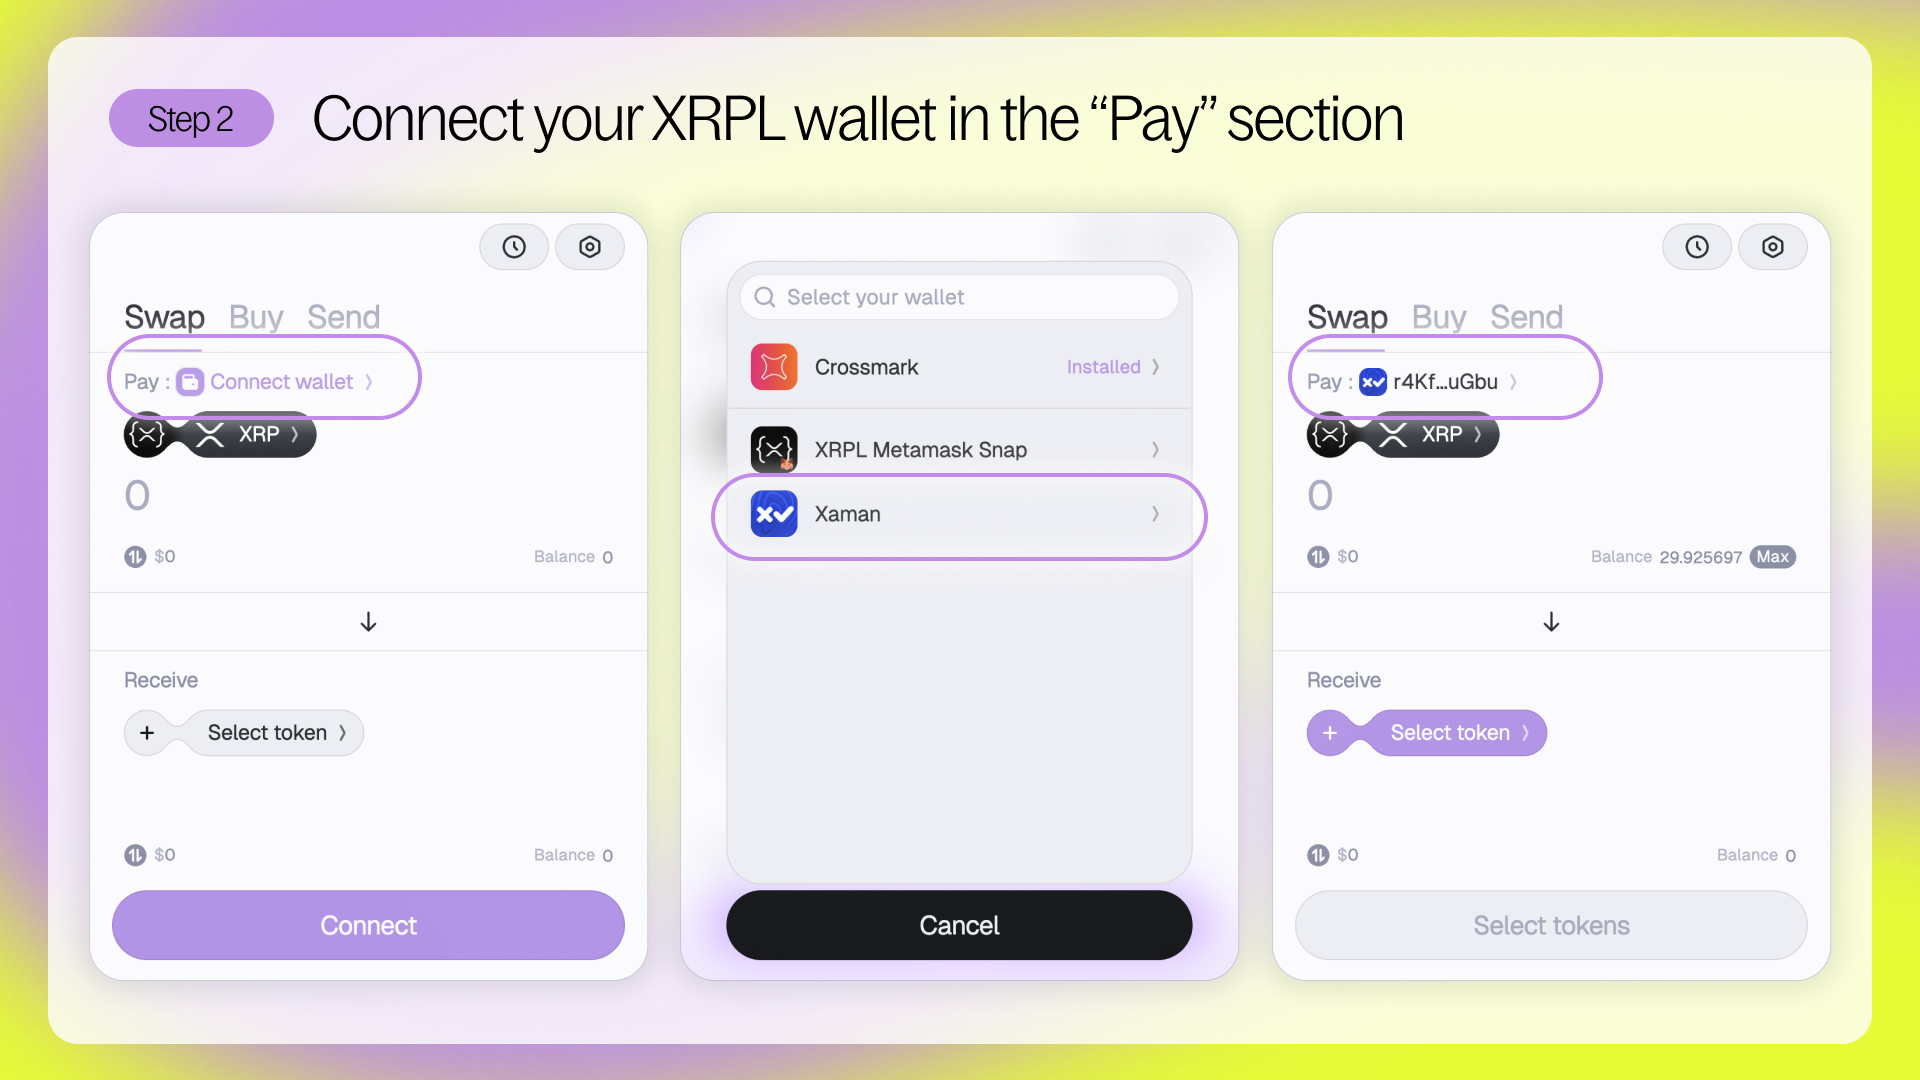
Step 2 - Connect your XRPL wallet
Click Connect Wallet next to Pay. Choose your XRPL wallet (like Xaman or Crossmark) and approve the connection. Want to learn more about using XRPL wallet with dApps? Check out: How to Connect Your XRPL Wallet to dApps and Submit Transactions - Securely →
Once connected, your XRPL wallet address will appear next to Pay.
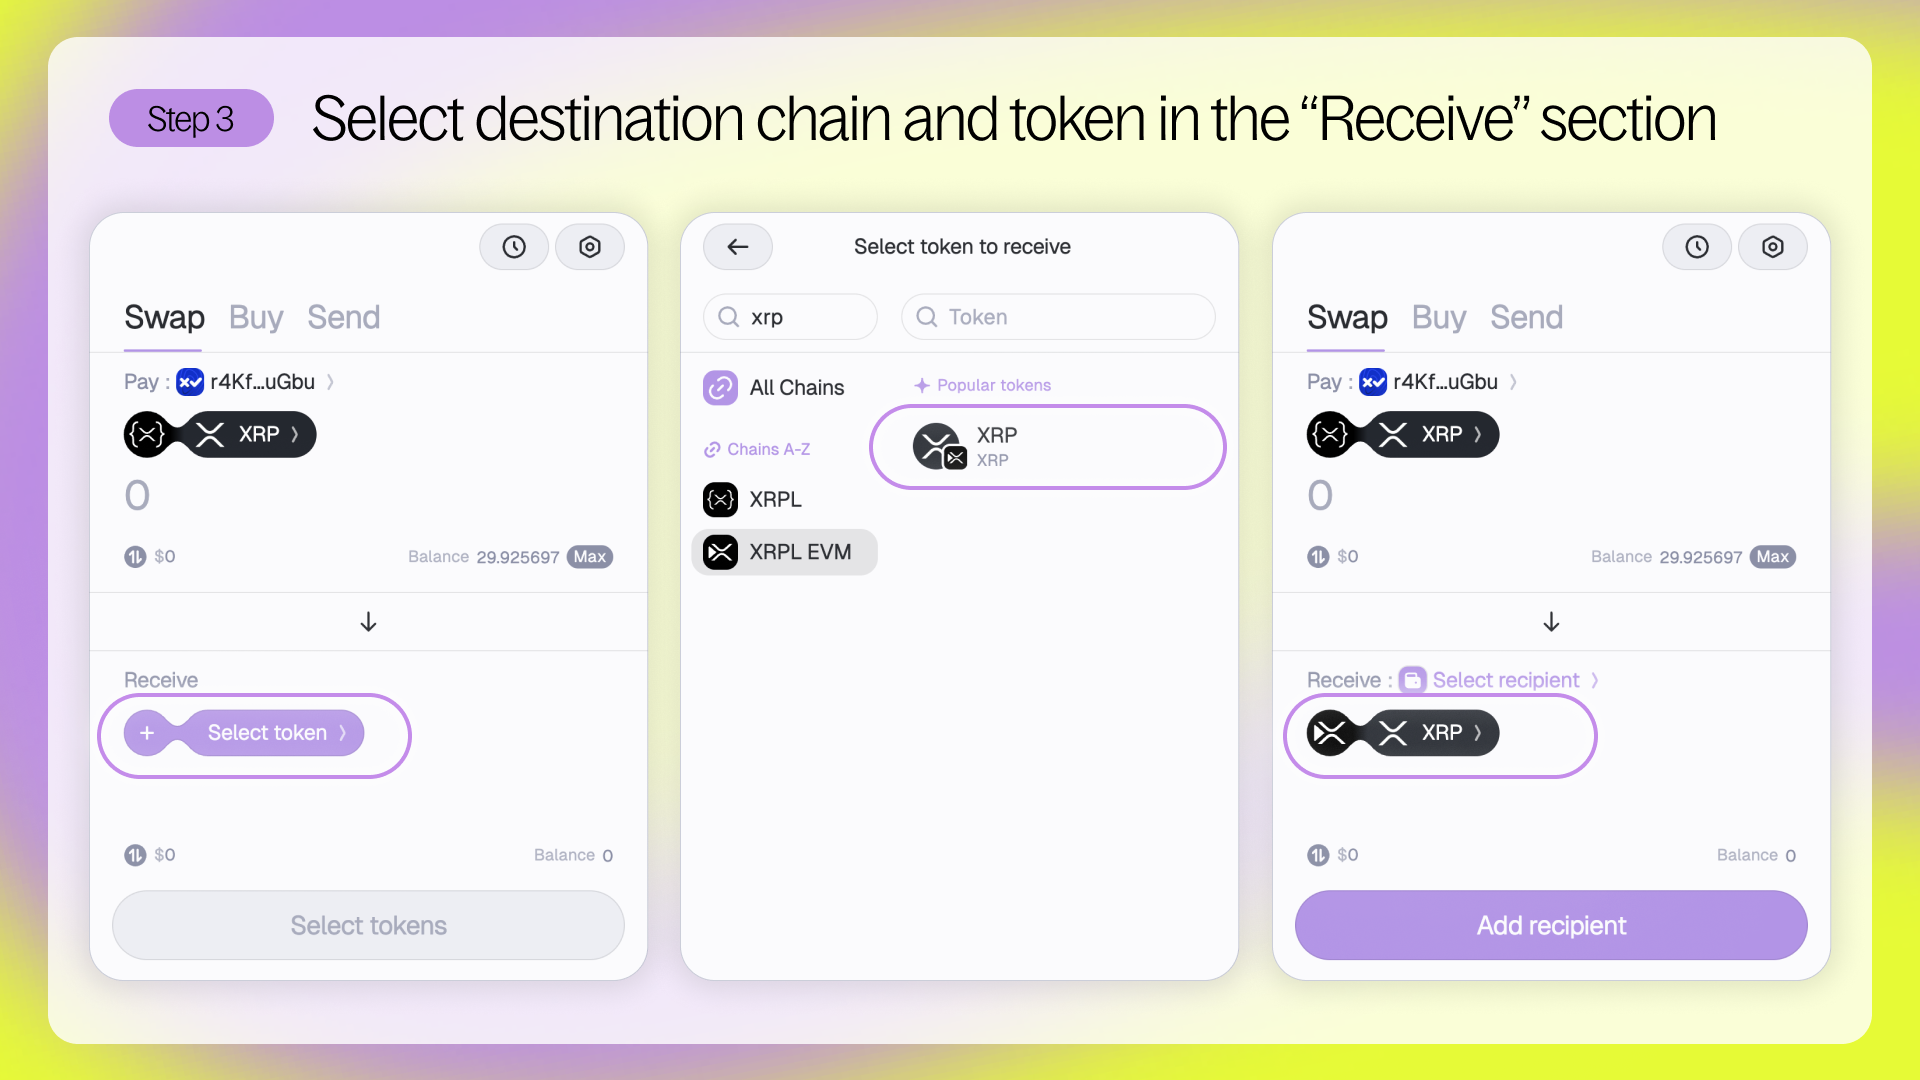
Step 3 - Select your destination chain and token
In the Receive section, click the chain and token dropdown to set your destination. Choose XRPL EVM as the chain and XRP as the token to receive.
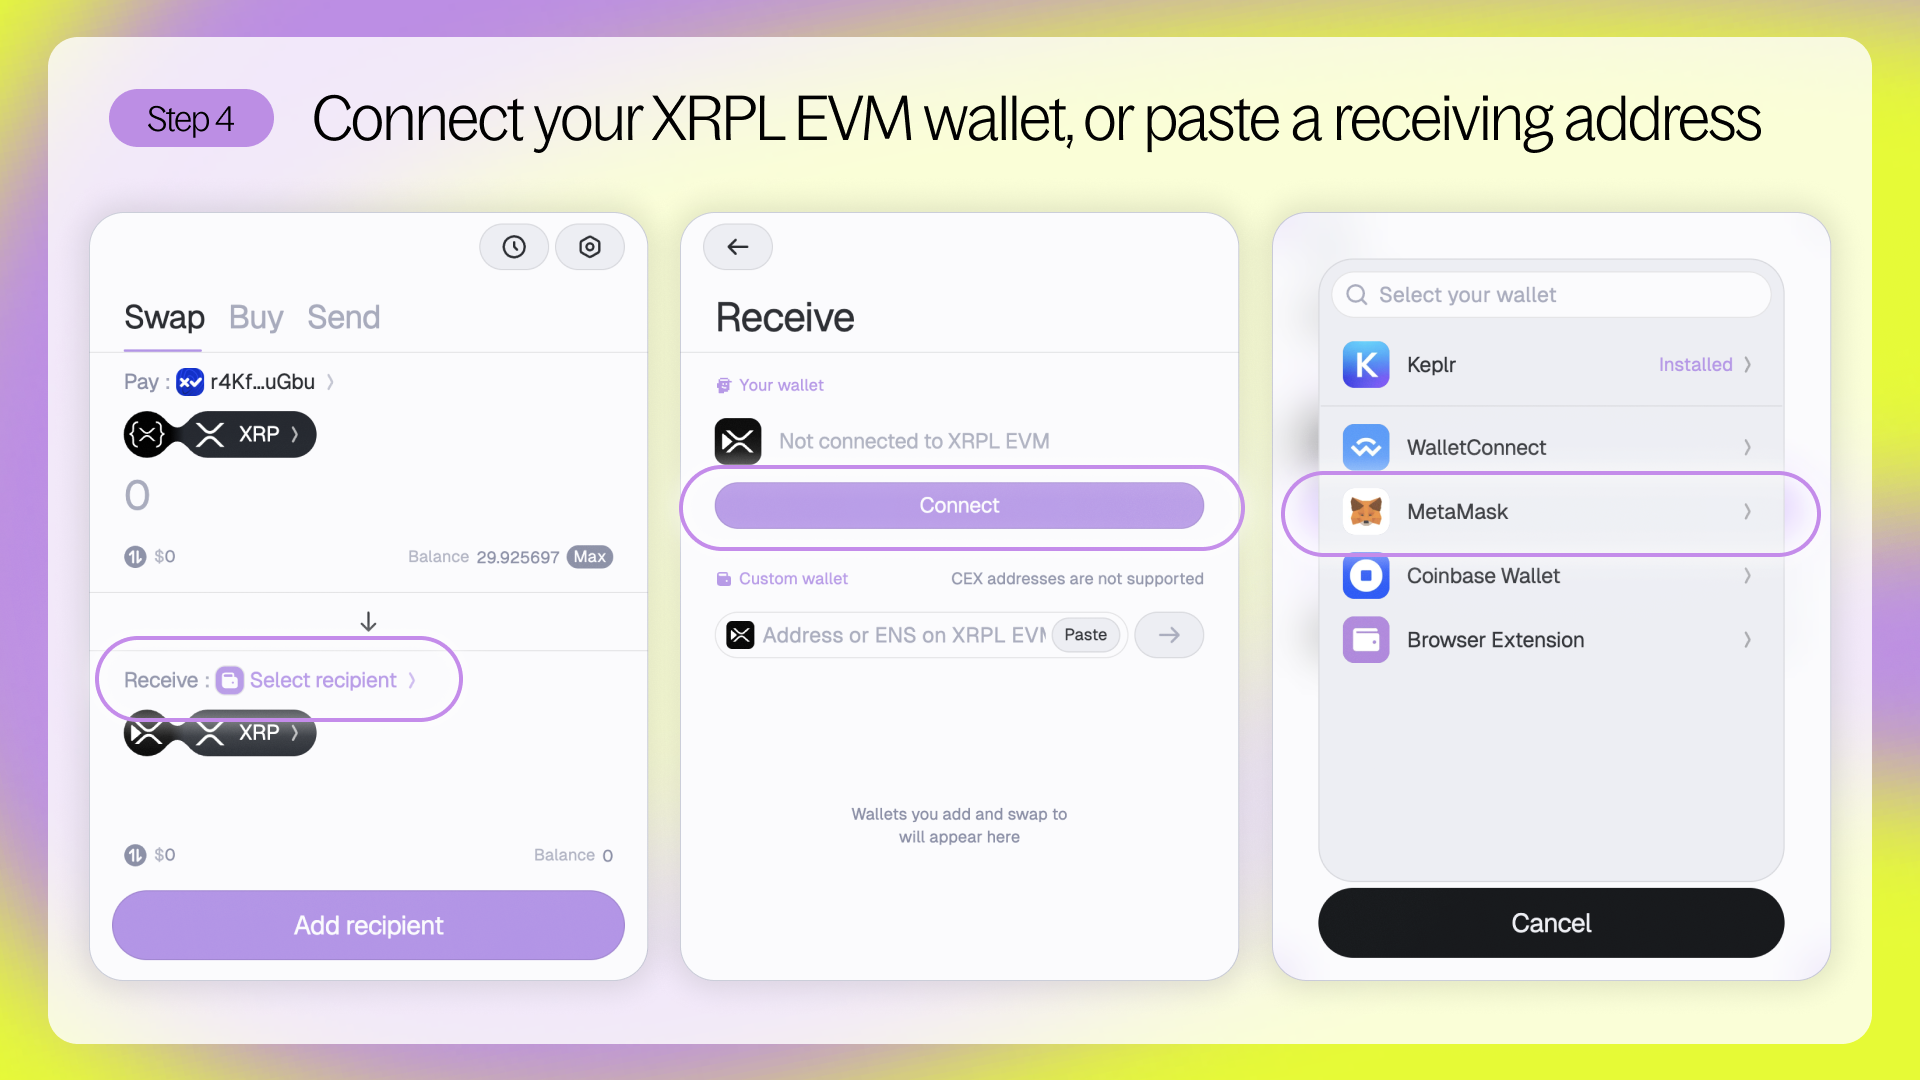
Step 4 - Connect your XRPL EVM wallet
Click Select Recipient next to Receive. Select your XRPL EVM-compatible wallet (like MetaMask) and approve the connection.
You’ll see your XRPL EVM wallet address appear next to Receive.
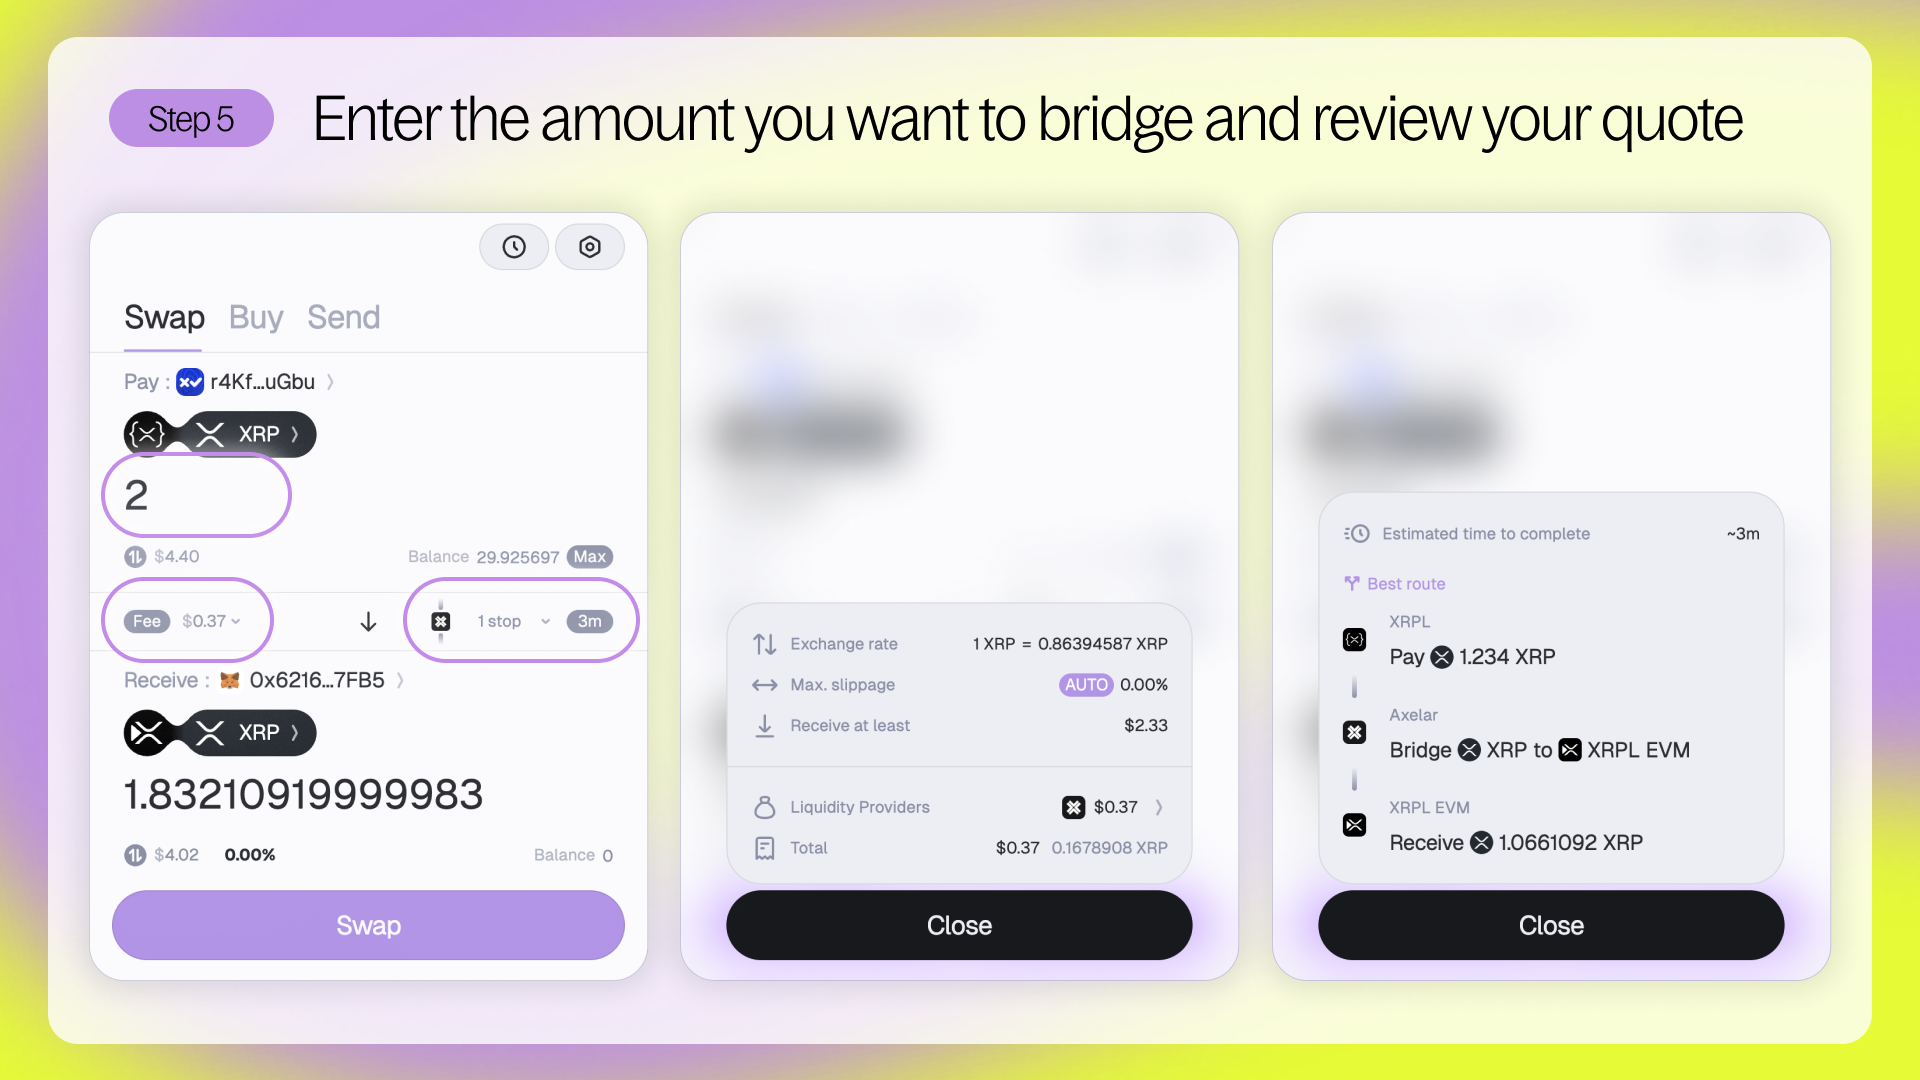
Step 5 - Enter the amount to bridge and review your quote
Type the amount of XRP you want to send in the input box under the source chain dropdown.
You can send partial amounts (e.g. 0.5 XRP), but make sure you leave enough in your XRPL wallet to cover network fees.
Squid will generate a quote showing:
- The amount you’ll receive on XRPL EVM
- The bridging route used
- Estimated time to complete
- Fees and breakdown
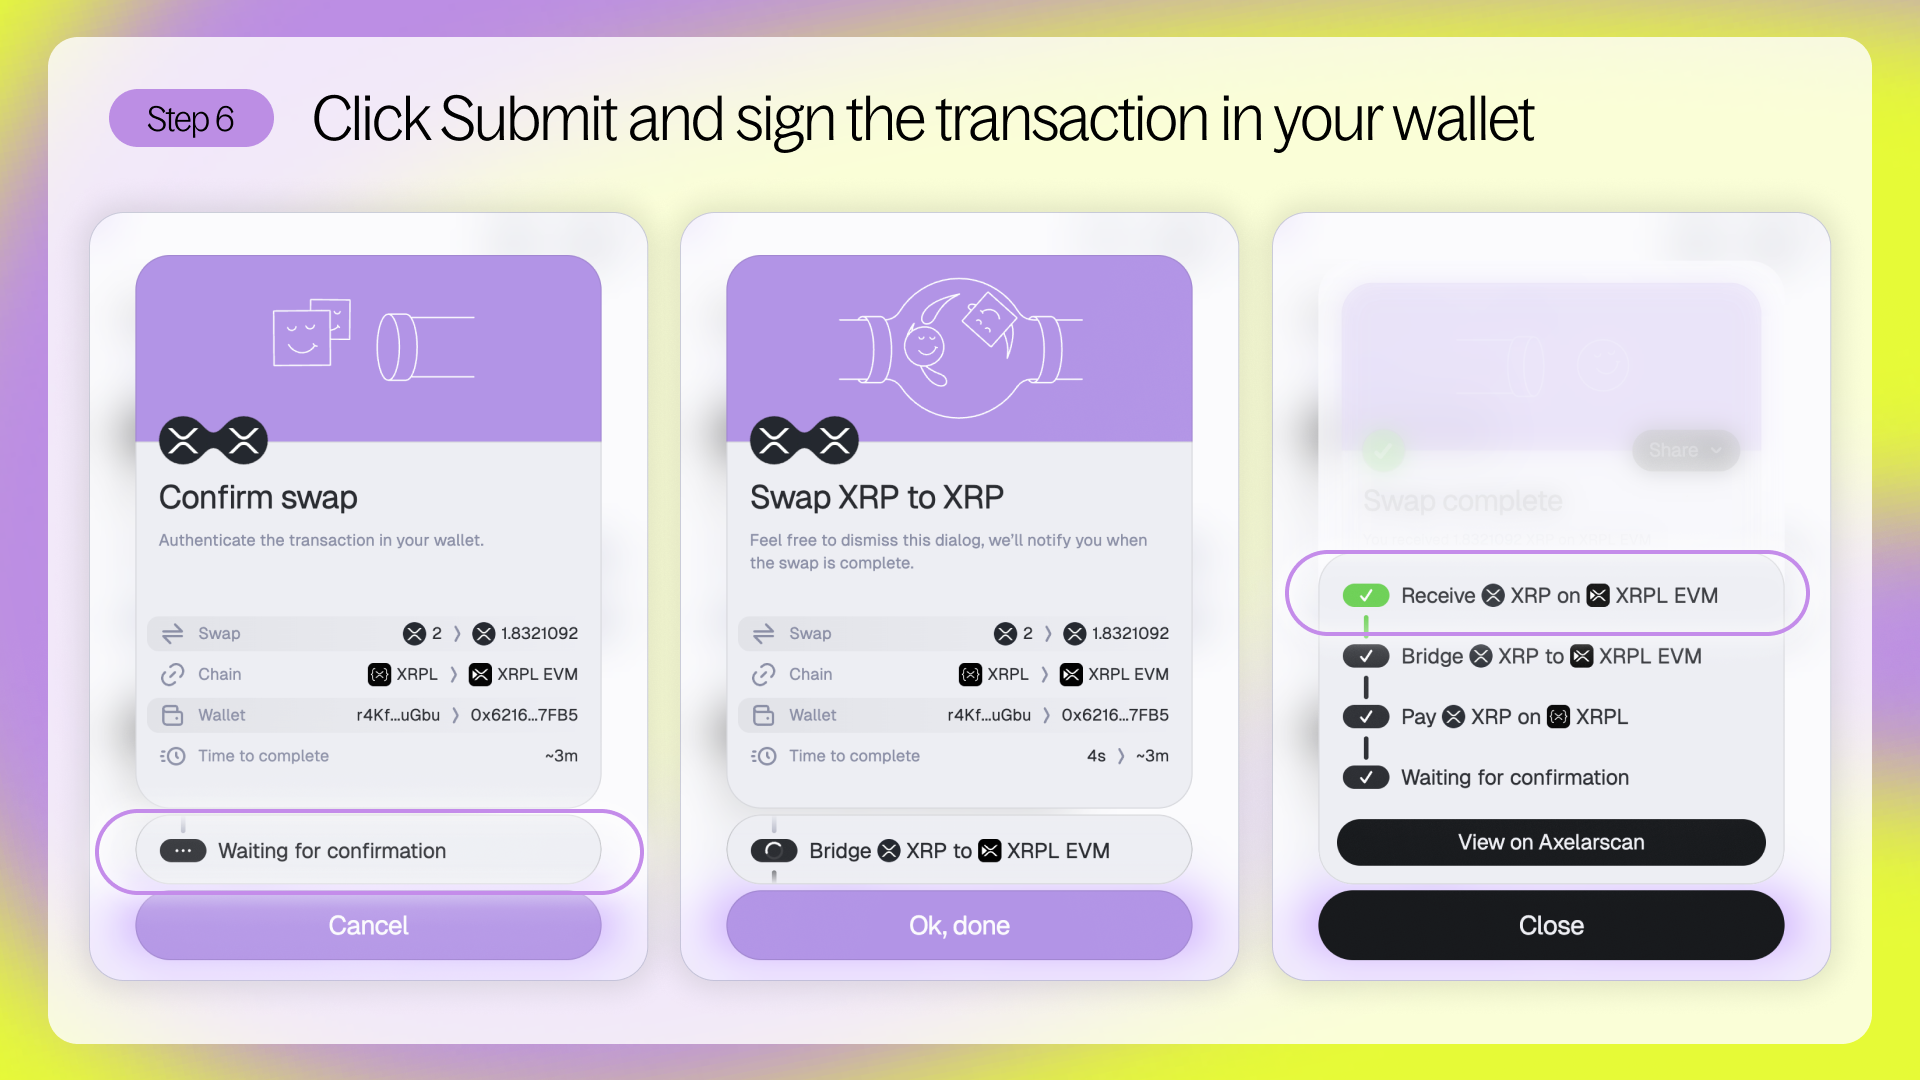
Step 6 - Click Swap and sign the transaction in your wallet
Click Swap, then approve the transaction in your wallet. You’ll see the status move from Processing to Complete once your XRP has successfully arrived on XRPL EVM.
Success!
That’s it - you’ve now bridged XRP from XRPL to XRPL EVM.
You should see your XRP in your XRPL EVM wallet, ready to use in smart contracts, DeFi, or dApps.
Bridging Back to XRPL
Nice work - now it’s time for the return journey.
If you’ve just bridged into XRPL EVM, your wallets should still be connected. This next step is even simpler.
If you’re still on the Squid app, you can just flip the trade direction:
- Click the ↕ arrow between the Pay and Receive sections to reverse the direction
- Enter the amount you want to send back to XRPL
- Approve and sign the bridge transaction - that’s it
If you’re returning to Squid’s app and don’t see your wallets connected, follow our XRPL EVM → XRPL guide for a full step-by-step walkthrough.
You’re done!
Your XRP is now back on XRPL - safely and smoothly.
Whether you're looping through both sides or just getting started, you’ve now bridged XRP both ways and seen how easy Squid makes it.
Whether this was your first time bridging or part of a bigger onchain journey, you’ve now bridged XRP both ways and seen how easy Squid makes it.